Posted on Leave a comment

Ink vs. Toner

The life of your book will depend you your choice between ink and toner. Throughout history ink has been made from many different materials. (Here is a link to a brief history of ink: http://en.wikipedia.org/wiki/Ink#History_of_ink). Because black ink was made from archival materials (often carbon based materials) they lasted for hundreds of years. Today we have basically three types of “inks”: printing press ink, toner, and spray inks. The small printers that many of us have hooked to our computers are usually dye based ink jet printers. They are inexpensive to buy but the ink cartridges are not. The other challenge is that dye inks are not archival and they are not water fast and will run when they get wet. Fortunately, they have developed pigmented inks that can be used in a laser jet printer. Pigmented inks are archival and when dry resist running and smudging. These inks are even more expensive, as you would expect, but they will last. (Here is a link to a good comparison between dye and pigmented inks: http://www.oddparts.com/ink/faq19.htm).

Toner is a great material that lasts. Black toner is made from carbon materials which is archival and should last as long as the paper does. Toner costs a lot less than ink cartridges on a per page basis. Ink that is used on a commercial printing press is almost always archival, so it works great for books. Printing press ink is even less than toner, so this method is very economical for long runs.

Ink verse toner. The debate continues on. Hopefully this will be helpful as you decide which method you want to use for your book.

Chris Stevenson cs@sgenealogy.com www.sgenealogy.com

Posted on Leave a comment

Captions are a Must

A picture is worth 1000 words, or so they say. But a picture without a caption isn’t worth very much. Identifying all of the people in a picture is of great value to your reader. Include when the picture was taken or the age of the person, even if it is only approximate. If the place is important then include that also. The information in the caption creates more value and interest in your book. Captions can be done in a different font style from the text so they stand out when they appear close to the text. A font that I see used frequently and looks very nice is bold italics in the Times Roman font.

Here are some links to web pages that explain how to use captions correctly in Word 2007: http://office.microsoft.com/en-us/word/HP012289821033.aspx

And in Word 2003: http://office.microsoft.com/en-us/word/HP051893791033.aspx?pid=CH061049401033

Remember the captions!

Chris Stevenson cs@sgenealogy.com www.sgenealogy.com

Posted on Leave a comment

Another Set of Eyes

You have finally finished your book. (Yea!) It has been a time consuming effort and now it’s ready to be published. There is just one more thing to do first. Don’t forget to have someone else proofread the manuscript before sending it to the publisher. It is amazing, but true, that another set of eyes will see things that you didn’t notice. They will be able to catch typos or confusing sentences that you missed (probably because you were so focused on the information). It has helped me and many of the people I have worked with, so don’t forget to have another set of eyes look over your book before you have it printed.

Chris Stevenson cs@sgenealogy.com www.sgenealogy.com
Posted on Leave a comment

Margins and white space

Margins and white space add a nice feel and a good visual image for your book. I usually recommend that you have about a one inch margin on all sides for letter-size books. Feel free to fudge on those margins with pictures and graphics where the information on the edges isn’t as important. You can enlarge a picture to fill the whole page with very small margins if the main subject of the picture is in the center. If your book is more than 500 pages and you are trying to reduce the number of pages (to keep it from being too heavy), then a 0.5 to 0.6 inch margin will work.

Depending on the binding you will lose a little of the page to the gutter (the inside margin of the binding edge). Most worgutterd processing programs allow you to compensate for this in page setup. Set your document for mirror margins for the whole document, and make the gutter 0.1 or 0.15, depending on the thickness of your book. This will shift the pages left (even pages) or right (odd pages) away from the gutter so it is easier to read.

You can also add a nice look to your book by moving the beginning of the chapters down on the page. Move the text a couple of inches down the page and it will stand out and be easier for the reader to find the beginning of the chapter. Test this out with a few different margins and spacing to see which you like best.

Chris Stevenson cs@sgenealogy.com www.sgenealogy.com

Posted on Leave a comment

Annual Family DVD

Each year for the past five years I have created a DVD that has pictures and video clips. My family loves watching them over and over and I enjoy making them. They take some time to make, but the end product turns out so good that it makes all worth it. I edit the video quite a bit so that it is interesting and I put the pictures into a slide show with musical background.

I thought that I would share some of the lessons that I have learned.

1. I transfer all of the video tapes for the year to the computer and then I make one set of DVDs without editing. I have found that if I make this set first then it’s not hard to cut out a lot of the video because I have a copy of the complete, raw video that I can personally watch if I want to see more. Maybe it is just a psychological thing but it works for me.

2. I work with a PC all day, every day and I love how it makes my life easier. But when it came to making videos, it didn’t work very well at all. I tried many different programs and even bought a new computer, but as soon as I did some video editing it wouldn’t work. I finally came to the realization that it wasn’t going to work on my PC. With my friend’s prompting, I bought a Mac and within a few weeks I had a perfect DVD to share with my family. Maybe there are new PC programs that will work now, but for me, the Macintosh is the only way to go. It works every time and editing is very easy.

3. Videos take a lot of memory, so I would suggest that you get as large of a hard drive as you can afford. You will also want to have an external hard drive that you can use as a back up. (See last week’s post about backing up.)

4. Plan a time of year to do it. For me, it works best to produce the DVD in January.

5. Put several different video clips on the DVD. Don’t try to put everything into one, long movie. If you break it down into shorter video segments then your family can watch the clips they want without having to sit through clips that they aren’t interested in (i.e. the clips they aren’t in.)

6. If you don’t have the desire or time to do it yourself, you can hire someone to do it for you, but remember that the editing decisions need to be yours. A stranger won’t know which shots are the most important to your family.

Chris Stevenson cs@sgenealogy.com www.sgenealogy.com

Posted on Leave a comment

Make a Backup & Store it Elsewhere

We live in a very fast, electronic age. It makes our life so much easier, but there is a little more risk. One of the risks of working with your book on a computer is loosing all or part of your computer files. I know that you have heard this before, but it is especially important to make backup copies each time that you work on your book. Make sure that your backups are on either a flash drive or separate disk so if the computer crashes or gets a virus you won’t lose both original and backup files. Something else that often gets overlooked is the possibility of disaster so occasionally store a backup copy in another location with a friend, relative, online, or at work in case you have a fire or flood. It is hard enough to gather all of the information and type it up the first time; I don’t want you to have to do it all over again.

Chris Stevenson cs@sgenealogy.com www.sgenealogy.com

Posted on Leave a comment

Print A Few Extra Books

If you have finished writing your book you may be wondering how many copies you should have printed. If your book is about an ancestor that has quite a few descendants, this could be a difficult question. It can be very helpful to contact relatives to determine their interest or better yet to get advanced orders from them. If you are giving them as gifts to your grandchildren, it is easier because you know how many grandchildren you have. Whatever method you used to determine the number of copies to print, there is one more thing for you to consider. After several people see your book in its finished form, you will be asked if you have some more copies. These people may be friends or relatives that didn’t show any interest before the book was done, but now that they can see how great it is and they can have an “instant” copy, they are interested. So my advice for you is to print a few extra books. It is less expensive to run a few extra copies when your book is being printed the first time than to start over and print and bind just a few copies at a later date. If your finances won’t permit this additional expense, consider approaching a relative that can finance the few additional copies. Then as you sell the additional books you can repay their investment in your book. I have found that it will save you a lot of hassle and expense if you print a few extra books with the first printing.

Chris Stevenson cs@sgenealogy.com www.sgenealogy.com

Posted on Leave a comment

Include a CD with Your Book

Here is something that can be of great benefit to your readers. It can be very beneficial to include, with your book, a CD that has an electronic copy of your book file. If you can, include both a PDF copy of the book plus the original file format (for information about PDF, see my post from Nov. 2009). These files will be searchable by your readers and can be a great aid to them in finding specific info that they are looking to find. You can even include, in a separate file, all the sources that you used to research and create the book. You might make another supplemental document that includes most or all of the parts of your book that were edited out. Then, if there is enough room on the CD, include JPEG copies of the pictures that you have in your book. You may have had other pictures or documents that were left out that you could include on a CD with very little extra cost or effort.

Making a CD to include with the book can even help you in editing your book. If you don’t really want to include all of the pictures you have of Uncle John in the printed book but you want the rest of the family to have all of them, then including them on the CD is the perfect answer. By putting this kind of CD in the back of your book, you will add great value for your readers for very little additional cost.

Chris Stevenson cs@sgenealogy.com www.sgenealogy.com

Posted on Leave a comment

Type it Myself or Hire it Out

Is it better to type my book myself or hire it out? This question could be changed to many different parts of the publishing process, but this post is specifically about typing. You might be the type of person that likes to do it yourself. But if you can’t seem to find the time to type up your book, you can easily hire that part out. If you’re not sure where to start looking for a typist, you could start looking in your own family. You can arrange for a relative to do it, if they are willing and have the time. You might check with a young married member of your family who is looking for additional income. Another place to look for a good typist is at a local college. You can find many students that want to earn a little money on the side who are very good typists. Even though you can turn the typing over to someone else, that doesn’t mean that you loose control of the content of the book. With red pen in hand, you can edit to your hearts content and rework the book over and over until it is just how you want. Don’t be shy about asking your typist to make the changes that you want. If you are excited about the end product, they will be happy to help you reach that goal.

Another option is to buy a software program that transcribes from your voice, like Dragon Naturally Speaking. For someone who is a very slow typist but still wants to do it themselves, this is a good option. I tried this program many years ago and it work fair, but I can imagine that they have improved it greatly since then. You could look into it and see if it will work for you and then leave a comment below to help others with this same problem.

Many publishers will have in-house or freelance people to help you with typing or other parts of the project that are just too overwhelming to you. The important thing to keep in mind is to overcome all of the obstacles that are in your way and successfully reach your end goal of publishing your history! Your history and your unique stories are too important to lose.

Chris Stevenson cs@sgenealogy.com www.sgenealogy.com

Posted on Leave a comment

Connect Chapters with a Visual Chart

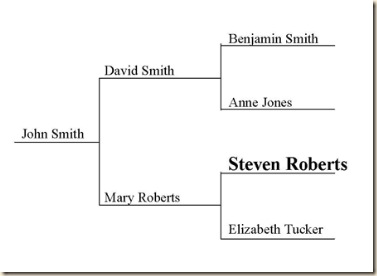
A few of the books that we have published have put a small pedigree chart at the beginning of each chapter. I thought that it was a good idea and for certain family histories, might be very useful. I’ll include a picture to demonstrate how this works, but essentially what you do is to create a small pedigree chart that shows the scope of the book. Then you use bold or a gray highlight to indicate where this chapter’s person is on the pedigree chart. It is a helpful way for your reader to be clear about who the person is that this chapter is about and how they fit in the family. I think that this would be extremely useful for families where names are repeated. You could also use this technique with a family group or a descendant chart. It may not work for your book, but I thought it was a good idea.

Here is an example:

PedigreeChapterStartExample

Chris Stevenson cs@sgenealogy.com www.sgenealogy.com